Difference between revisions of "DWM ADD-ON/DWM Hardware/Integration guide"
(Created page with "{{subst:Hardware versioning|nome-som=DWM}}") |
|||
| (10 intermediate revisions by 3 users not shown) | |||
| Line 1: | Line 1: | ||
| − | <section begin=History/> | + | <section begin="History" /> |
{| style="border-collapse:collapse; " | {| style="border-collapse:collapse; " | ||
| − | !colspan="4" style="width:100%; text-align:left"; border-bottom:solid 2px #ededed"|History | + | ! colspan="4" style="width:100%; text-align:left" ; border-bottom:solid 2px #ededed" |History |
|- | |- | ||
| − | + | ! style="border-left:solid 2px #73B2C7; border-right:solid 2px #73B2C7;border-top:solid 2px #73B2C7; border-bottom:solid 2px #73B2C7; background-color:#73B2C7; padding:5px; color:white" |Issue Date | |
| − | !style="border-left:solid 2px #73B2C7; border-right:solid 2px #73B2C7;border-top:solid 2px #73B2C7; border-bottom:solid 2px #73B2C7; background-color:#73B2C7; padding:5px; color:white"|Issue Date | + | ! style="border-left:solid 2px #73B2C7; border-right:solid 2px #73B2C7;border-top:solid 2px #73B2C7; border-bottom:solid 2px #73B2C7; background-color:#73B2C7; padding:5px; color:white" |Notes |
| − | !style="border-left:solid 2px #73B2C7; border-right:solid 2px #73B2C7;border-top:solid 2px #73B2C7; border-bottom:solid 2px #73B2C7; background-color:#73B2C7; padding:5px; color:white"|Notes | ||
|- | |- | ||
| − | |style="border-left:solid 2px #73B2C7; border-right:solid 2px #73B2C7;border-top:solid 2px #73B2C7; border-bottom:solid 2px #73B2C7; background-color:#edf8fb; padding:5px; color:#000000"| | + | | style="border-left:solid 2px #73B2C7; border-right:solid 2px #73B2C7;border-top:solid 2px #73B2C7; border-bottom:solid 2px #73B2C7; background-color:#edf8fb; padding:5px; color:#000000" |{{oldid|11485|2020/11/10}} |
| − | | | + | | style="border-left:solid 2px #73B2C7; border-right:solid 2px #73B2C7;border-top:solid 2px #73B2C7; border-bottom:solid 2px #73B2C7; background-color:#edf8fb; padding:5px; color:#000000" |New documentation layout |
| − | |style="border-left:solid 2px #73B2C7; border-right:solid 2px #73B2C7;border-top:solid 2px #73B2C7; border-bottom:solid 2px #73B2C7; background-color:#edf8fb; padding:5px; color:#000000"| | ||
|- | |- | ||
| + | | style="border-left:solid 2px #73B2C7; border-right:solid 2px #73B2C7;border-top:solid 2px #73B2C7; border-bottom:solid 2px #73B2C7; background-color:#edf8fb; padding:5px; color:#000000" |{{oldid|12599|2021/01/19}} | ||
| + | | style="border-left:solid 2px #73B2C7; border-right:solid 2px #73B2C7;border-top:solid 2px #73B2C7; border-bottom:solid 2px #73B2C7; background-color:#edf8fb; padding:5px; color:#000000" |More information about antenna calibration | ||
|- | |- | ||
| − | + | ! style="border-left:solid 2px #73B2C7; border-right:solid 2px #73B2C7;border-top:solid 2px #73B2C7; border-bottom:solid 2px #73B2C7; background-color:#edf8fb; padding:5px; color:#000000" |2021/02/12 | |
| − | + | ! style="border-left:solid 2px #73B2C7; border-right:solid 2px #73B2C7;border-top:solid 2px #73B2C7; border-bottom:solid 2px #73B2C7; background-color:#edf8fb; padding:5px; color:#000000" |Non EU antenna regulator warning | |
| − | |||
| − | |||
| − | |||
| − | |||
| − | |||
|- | |- | ||
|} | |} | ||
| − | <section end=History/> | + | <section end="History" /> |
__FORCETOC__ | __FORCETOC__ | ||
| − | <section begin=Body/> | + | <section begin="Body" /> |
| + | |||
| + | ==Integration guide== | ||
| + | This section provides useful information and resources that let the system designer integrate the DWM module in the application very quickly. | ||
| + | |||
| + | === Typical scenario=== | ||
| + | |||
| + | The following picture shows the conceptual block diagram of the application where the host is an Embedded PC. | ||
| − | + | [[File:Dwm-epc-scenario.png|thumb|center|400px|Typical scenario]] | |
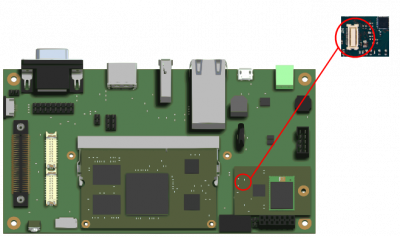
| + | [[File:AXEL_Lite-EVB-DWM-connector.png|thumb|center|400px|Real case scenario on AXEL Lite SOM Evaluation Kit|link=AXEL Lite SOM/AXEL Lite Evaluation Kit]] | ||
| − | == | + | ===Electrical guidelines=== |
| + | *Keep SDIO lines as short as possible. | ||
| + | *5V and 3.3V rails can power up in any order | ||
| + | *Keep WIFI_EN asserted during power-up sequence | ||
| − | DWM | + | ===Calibration process=== |
| + | The radio interface of the DWM module is configured by several parameters. These parameters are set through a calibration process, that is described in detail [http://processors.wiki.ti.com/index.php/WL12xx_NLCP_Calibration_Process here]. | ||
| − | + | The calibration process—that produces an NVS file—is not trivial. Apart from the chip itself (Texas Instruments WL1271L in this case), it depends on: | |
| − | * | + | *the antenna - a list of [https://www.lairdconnect.com/wireless-modules/wifi-modules-bluetooth/tiwi-ble#certified-antennas certified antennas] and cables can be found in the TiWi Module device datasheet. Use of these antennas does not require additional FCC/IC/ETSI certifications. |
| − | * | + | *the firmware version downloaded to the chip: please refer to the proper firmware available on your Linux distribution for matching the kernel driver and run properly the calibration process |
| − | + | *the initialization data, typically stored in an INI file: please refer to the [https://www.lairdconnect.com/wireless-modules/wifi-modules-bluetooth/tiwi-ble#documentation Laird Connectivity TiWi documentation] for checking the proper INI file configuration | |
| + | *the Calibrator source code [https://github.com/TI-OpenLink/ti-utils/tree/ol_R5.SP8.01 here] | ||
| + | More information about kernel driver and calibration on the [https://www.lairdconnect.com/forum/tiwi-ble/online-documentation/support-and-tools Laird Support and Tools] web page. | ||
| + | ==== MAC address ==== | ||
| + | The MAC address is set at calibration time for WLAN. To use the built in MAC address for WLAN be sure to pass a MAC address of <code>00:00:00:00:00:00</code> as a parameter to the auto-calibrate function. To set a custom MAC address for WLAN just pass the desired value into the auto-calibrate function. | ||
| − | [[ | + | ==== NVS ready-to-use calibration files ==== |
| + | The following links refer to specific use cases, where the resulting NVS file is provided along with DAVE Embedded Systems products integrating DWM module. | ||
| + | *[[XUELK-AN-001:_Using_WiFi-Bluetooth_combo_plugin_with_SBC_Lynx|SBC Lynx (XUELK)]] | ||
| + | *[[XUELK-AN-002:_Running_Debian_distribution#Bluetooth_and_WiFi|SBC Lynx (Debian)]] | ||
| + | The <code>nvs.bin</code> file has been created using the antenna [http://www.molex.com/molex/products/datasheet.jsp?part=active/0479500011_ANTENNAS.xml Molex 47950-0011] | ||
| + | Please refer to the below Laird Connectivity TiWi-BLE documentation for more information. | ||
| − | [[File: | + | ===Tested Antennas=== |
| + | Following a list of tested and approved antennas: | ||
| + | * Laird technology 001-0001 with UFL to SMA adapter [[File:001-0001.png|thumb|100px|none]] [[File:1300-00041.png|thumb|100px|none]] | ||
| + | * | ||
| + | {{ImportantMessage|text=Molex 47950-0011 valid only for '''No EU''' countries - see [https://www.lairdconnect.com/documentation/regulatory-information-tiwi-ble link][[File:4795.png|thumb|100px|none]] }} | ||
| + | === References === | ||
| + | * [https://www.lairdconnect.com/wireless-modules/wifi-modules-bluetooth/tiwi-ble#documentation Laird Connectivity TiWi-BLE documentation] | ||
| + | * [https://www.lairdconnect.com/documentation/tiwi-ble-datasheet TiWi-BLE datasheet] | ||
| + | * [https://www.lairdconnect.com/documentation/tiwi-antenna-design-guide Antenna Design Guide] | ||
| + | * [https://www.lairdconnect.com/documentation/tiwi-emc-compliance-guide EMC Compliance Guide] | ||
| + | * [https://www.lairdconnect.com/documentation/wlan-ini-etsi-all-certified-antennas WLAN INI all certified antennas] | ||
| + | * [http://linuxwireless.sipsolutions.net/en/users/Drivers/wl12xx/ WL127x Linux Calibrator] | ||
---- | ---- | ||
[[Category:DWM]] | [[Category:DWM]] | ||
Latest revision as of 08:11, 12 January 2024
| HOME | SOMs | SBCs | ToloMEO Embedded Assistant | ||
| Roadmap | IoT Services | ML/AI services | Embedded Design Services |
| History | |||
|---|---|---|---|
| Issue Date | Notes | ||
| New documentation layout | |||
| More information about antenna calibration | |||
| 2021/02/12 | Non EU antenna regulator warning | ||
Contents
Integration guide[edit | edit source]
This section provides useful information and resources that let the system designer integrate the DWM module in the application very quickly.
Typical scenario[edit | edit source]
The following picture shows the conceptual block diagram of the application where the host is an Embedded PC.

Electrical guidelines[edit | edit source]
- Keep SDIO lines as short as possible.
- 5V and 3.3V rails can power up in any order
- Keep WIFI_EN asserted during power-up sequence
Calibration process[edit | edit source]
The radio interface of the DWM module is configured by several parameters. These parameters are set through a calibration process, that is described in detail here.
The calibration process—that produces an NVS file—is not trivial. Apart from the chip itself (Texas Instruments WL1271L in this case), it depends on:
- the antenna - a list of certified antennas and cables can be found in the TiWi Module device datasheet. Use of these antennas does not require additional FCC/IC/ETSI certifications.
- the firmware version downloaded to the chip: please refer to the proper firmware available on your Linux distribution for matching the kernel driver and run properly the calibration process
- the initialization data, typically stored in an INI file: please refer to the Laird Connectivity TiWi documentation for checking the proper INI file configuration
- the Calibrator source code here
More information about kernel driver and calibration on the Laird Support and Tools web page.
MAC address[edit | edit source]
The MAC address is set at calibration time for WLAN. To use the built in MAC address for WLAN be sure to pass a MAC address of 00:00:00:00:00:00 as a parameter to the auto-calibrate function. To set a custom MAC address for WLAN just pass the desired value into the auto-calibrate function.
NVS ready-to-use calibration files[edit | edit source]
The following links refer to specific use cases, where the resulting NVS file is provided along with DAVE Embedded Systems products integrating DWM module.
The nvs.bin file has been created using the antenna Molex 47950-0011
Please refer to the below Laird Connectivity TiWi-BLE documentation for more information.
Tested Antennas[edit | edit source]
Following a list of tested and approved antennas:
- Laird technology 001-0001 with UFL to SMA adapter


 |

References[edit | edit source]
- Laird Connectivity TiWi-BLE documentation
- TiWi-BLE datasheet
- Antenna Design Guide
- EMC Compliance Guide
- WLAN INI all certified antennas
- WL127x Linux Calibrator